This is a step-by-step guide for using Remix to build and execute an approve function. It’s written for the Tellor Contracts on Polygon and Mumbai specifically, but the methods outlined here can be adjusted and used with most other ERC20 token contracts also. Enjoy!
Introduction: Why do we need to do this?
If you’re reading this, you’re probably already familiar with token spend approvals. When you’re making a Uniswap trade or buying an NFT on Opensea, the user interface will prompt you to allow token spend before you can do what you want to do. This is because a good token contract requires that you give signed permission for other smart contracts to spend your tokens before they’re yanked out of your wallet.
Using Etherscan as the front-end for the same trade is a bit less automatic. If you’re calling a contract function that moves your tokens, you need to call the approve function first at the ERC20 token address to allow the spender contract to take your tokens.
Now, when that same ERC20 token is bridged onto another chain, using the block explorer can get a bit trickier. Let’s look at the Tellor Tribute (?) for this example.
TRB is used for staking and disputing in the Tellor oracle system, and because the token contract was upgraded in the past, (immutable now) it uses a proxy standard. This makes initiating a dispute on polygon a bit tricky, because polygonscan does not allow proxy contract verification the same way that etherscan does. Long story short, when you visit the Bridged TRB token on polygonscan, the approve function simply isn’t there.
It’s a bit more work, but you can still use web based tools to give the Polygon Tellor Governance contract permission to take your dispute fee. We’ll learn how to do that now.
Onward! To the guide!
The Guide
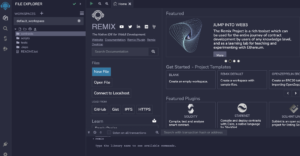
1) Navigate to remix.ethereum.org. You should see a page that looks like this:
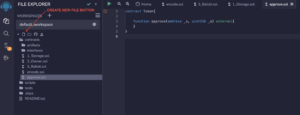
2) Click on the contracts folder and create a new file called approve.sol. This will open up a code window on the right side of the page.
3) Copy the following chunk of solidity code and paste it into the code box:
contract Token{

   function approve(address _s, uint256 _a) external{
   }
}
Your screen should now look like this:
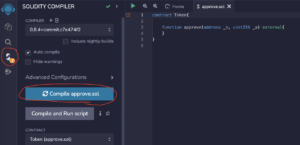
4) Click on the Solidity compiler button (image below), and then click the button that says “Compile approve.sol.” You can safely ignore any warnings from the solidity compiler because we’re not going to be publishing this code.
5) Click on the button for “Deploy and Run Transactions (image below). Change environment to be “Injected Provider Metamask”. Double check the address that you’re connecting with and the network you’re transacting on. Next to the “At Address” button, paste the contract address for the token that you want to interact with. The Mumbai bridged TRB contract address is: 0xCE4e32fE9D894f8185271Aa990D2dB425DF3E6bE
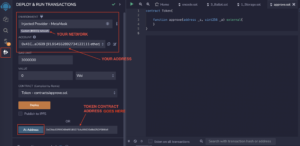
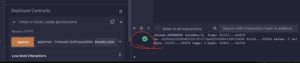
6) Click the At Address button (image above). Scroll down to and expand the Deployed Contracts section. You will see that there is a button for our approve function and a field ready for your inputs!
7) For our purposes here, we will assume that the dispute fee is 100 TRB, and approve the Tellor Governance contract to spend up to that that amount of tokens so that you could initiate a dispute. Next to the orange approve button, enter the Tellor Governance contract address and the number of tokens that you want to approve including 18 decimals (because EVM reasons). (image below)
The Tellor Governance contract address on Mumbai: 0x7B74cc7d66f4b286A78d5F02a55E36E89c3fa9F0
100 tokens + 18 decimals: 100000000000000000000
Input: 0x7B74cc7d66f4b286A78d5F02a55E36E89c3fa9F0,100000000000000000000
Important Note: The dispute fee amount is variable depending on the reporter stake amount. The getDisputeFee function can be read from the Tellor governance contract on each chain. A full list of contracts can be found here.
8) Click the approve button and finalize the transaction in your metamask wallet. If you see a green check-mark in the log, you’re all done!
You can now head to polygonscan mumbai to call beginDispute!
For more information and important considerations for disputing Tellor values, navigate to docs.tellor.io. Thanks for reading! ?