
This is a step-by-step guide for installing Python3.9 and the python virtual environment manager: venv. The methods outlined here are intended for a fresh installation of Ubuntu 20.04 LTS.
Prerequisites:
- A computer, virtual machine (AWS, Google Cloud, etc.), or windows subsystem for linux (WSL) running ubuntu version 20.04. (other versions of Ubuntu are probably fine, but 20.04 was used for testing this guide)
The Guide
This is a beginner-friendly guide. Familiarity with the command line will be helpful, but otherwise no assumptions are made about your technical skill. You can simply copy and paste these commands. We will:
- Install python 3.9
- Install venv and create a python virtual environment
Install Python 3.9
1) Check your python version with the command: python3 -V This will output your current version of python3. For example: [Python 3.8.10]. Make a note of your current version for step 4.
2) Download the python repository for ubuntu: sudo add-apt-repository ppa:deadsnakes/ppa
3) Install Python 3.9: sudo apt install python3.9
Python 3.9 is now installed, but it may not be the default version on your machine. Let’s configure versions now.
4) Enter the following command, but replace “/usr/bin/python3.8” with your current version if different. (for example use “/usr/bin/python3.10” if you got 3.10 from step 1).
sudo update-alternatives --install /usr/bin/python3 python3 /usr/bin/python3.8 1
Set python3.9 as option 2:
sudo update-alternatives --install /usr/bin/python3 python3 /usr/bin/python3.9 2
Finally, check your available versions:
sudo update-alternatives --config python3
You should see a list of python versions like this:
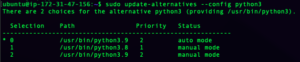
Press enter to confirm python3.9, or select the option for python 3.9.
5) Finally, double check your python version with: python3 -V
Install venv and Create a Python Virtual Environment
A python virtual environment is like a container that isolates your python project from your base python installation. (Using venv is highly recommended for running all Tellor clients as it can help with avoiding dependency conflicts.)
1) Install venv: sudo apt-get install python3.9-venv
2) Create a python virtual environment directory called tenv: python3 -m venv tenv
3) Activate the virtual environment: source tenv/bin/activate
Great work! Thanks for reading.
Check out https://tellor.io/category/guides/ for more ?.