This is a step by step guide for how to install Telliot using the command line. Telliot is an open source client for interacting with the Tellor oracle. The methods outlined here were confirmed on a fresh installation of Ubuntu 20.04 LTS (Amazon t2.micro AWS instance). Individual commands will differ with other environments (particularly for installing python 3.9), but the process is relatively similar for setting up Telliot on Mac (requires homebrew). You may use powershell if you’re familiar with using python on windows or use WSL (ubuntu 20.04) for better compatibility with this guide.
Prerequisites:
- A computer, virtual machine, or windows subsystem for linux running ubuntu version 20.04. (other versions are probably fine, but 20.04 was used for testing this guide)
- An ethereum address that has TRB tokens and native tokens (gas) for the network on which you want to report oracle data.
- Node endpoints for Ethereum Mainnet, and other network(s) on which you want to report. You can use your own node, or use a provider like Infura. For a list of popular providers, click here.
The Guide
This is a beginner-friendly guide. Familiarity with the command line will be helpful, but otherwise no assumptions are made about your technical skills. We will go over in detail the commands necessary to:
- Install python 3.9 (Telliot will not work with other versions like 3.8 or 3.10)
- Create a python virtual environment
- Install Telliot
- Configure RPC endpoints
- Verify Installation
Let’s get started!
Install python3.9
1) Check your python version with the command: python3 -V This will output your current version of python3. For example: [Python 3.8.10]. Make a note of your current version for step 4.
2) Download the python repository for ubuntu: sudo add-apt-repository ppa:deadsnakes/ppa
3) Install Python 3.9: sudo apt install python3.9
Python 3.9 is now installed. Now, let’s make sure that it’s the default python version on our machine.
4) Configure versions. Enter the following command, but replace “/usr/bin/python3.8” with your current version if different. (for example use “/usr/bin/python3.10” if you got 3.10 from step 1).
sudo update-alternatives --install /usr/bin/python3 python3 /usr/bin/python3.8 1
Set python3.9 as option 2:
sudo update-alternatives --install /usr/bin/python3 python3 /usr/bin/python3.9 2
Finally, check your available versions:
sudo update-alternatives --config python3
You should see a list of python versions like this:
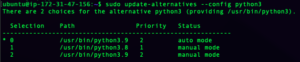
Press enter to confirm python3.9, or select the option for python 3.9.
5) Finally, double check your python version with: python3 -V
Important: If you’ve completed the steps and your python3 version is anything other than 3.9.xx, you will not be able to use telliot. Please make sure you are running python 3.9 before you continue.
Create a Python Virtual Environment
A python virtual environment is like a container where telliot will be installed on your machine. Working in a virtual environment is not mandatory, but it helps in avoiding dependency conflicts if you plan on using the computer/VM for running other python software.
1)Install venv: sudo apt-get install python3.9-venv
2) Create a python virtual environment directory called tenv: python3 -m venv tenv
3) Activate the virtual environment: source tenv/bin/activate
Install Telliot
1) Clone the telliot-core repo: git clone https://github.com/tellor-io/telliot-core
2) Clone the telliot-feeds repo: git clone https://github.com/tellor-io/telliot-feeds
3) Change directory (cd) into the telliot-feeds folder that you just downloaded: cd telliot-feeds
4) Install telliot-feeds with the command: pip install -e .
5) Change directory to the telliot core folder with cd and then cd telliot-core
6) Install telliot-core with the command: pip install -e .
Configure a mainnet RPC Endpoint
1) Create the Telliot configuration files: telliot config init
Note: At the time of writing this command results in “IndexError.” This can be ignored. You should now have a telliot folder in your home directory. You can check from the command line with the [ls] command.
2) Edit endpoints.yaml. Since this guide works for an AWS ubuntu machine, we will use a cli based text editor called nano. Open endpoints.yaml with: nano telliot/endpoints.yaml
Your screen should look something like this:
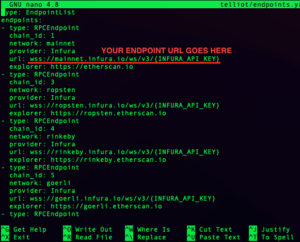
Use the arrow keys to navigate the document and edit the mainnet node endpoint URL to match your own. Telliot requires that you configure at least the Ethereum mainnet endpoint for its functionality. (You may add endpoints for other networks also if you have those ready.)
If you make a mistake, exit the document with [ctrl+x] [n] (don’t save changes) and press enter to confirm. Then open the document and start editing again.
When you’re done editing and you want to save your changes, use [ctrl+x] [y] and press enter to confirm.
Verify Installation
We can now check if Telliot was installed correctly with the command: telliot –-help
If Telliot was installed properly, the log will look like this:
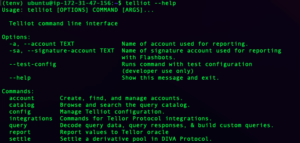
Great work Tellorian! You’re ready to report! ?
Head over to the next blog post to learn How to Report Oracle Data With Telliot.
Troubleshooting
If you got a python error / traceback after running [telliot –help], Here are some things to try:
- Quadruple check your version on python.
- Check that your python virtual environment is activated and that telliot is installed there.
- Check your endpoint URLs in endpoints.yaml.
If you got an error earlier in the process, it’s most likely because you’re using a system that’s different from the one described at the top of the guide. Don’t despair! Running python programs can be tricky to learn, but there are oodles of forums and resources to be found online. Try googling your exact error, or if all else fails feel free to reach out in the Tellor Discord for help!
Thanks for Reading!