This is a step-by-step guide on how to use Telliot for reporting Tellor oracle data. This is not a guide for how to install Telliot. If you haven’t installed Telliot yet, check out our noob friendly installation guide, and come back when you’re ready to report.
Private keys note: Reporting Tellor oracle data with Telliot involves working with private keys for ethereum accounts. Handling private keys should always be done with care. It is highly recommended that you create an address just for reporter testing that does not hold any real money.
Introduction
Telliot is the open source client software for Tellor. Tellor is a decentralized oracle that works via smart contracts on various EVM chains. The Tellor oracle connects people/contracts that need data from the 0ff-chain internet with people who can provide that data permissionlessly. The people who provide data are called reporters. Reporters running Telliot are ready to handle these data requests in real time creating data submissions that qualify for on-chain TRB tips.
Prerequisites:
- A working Telliot installation.
- A metamask (or other) wallet that holds MATIC and TRB on the polygon mumbai network. You can grab some Mumbai MATIC from the faucet here. Mumbai TRB is minted on Goerli and bridged to Mumbai. Follow the documentation here. Alternatively, you can make a tweet to request mumbai TRB @trbfaucet.
- A Polygon Mumbai node endpoint url. You can use your own node, or use a provider like Infura. For a list of popular providers, click here.
Now, onward! To the guide!
The Guide
We’re going to be transacting on a testnet in these examples, and it doesn’t cost anything to learn how to report. If you’re going to use Telliot to report on mainnet, please keep in mind that calling the Tellor contract functions will cost gas and that it can be unclear whether or not any individual data submission will be profitable after gas costs.
Advanced techniques, such as using the Flashbots network, are outside the scope of this beginner friendly guide.
We will cover:
- Configure reporting accounts
- Configure node Endpoints
- Using Telliot to Submit a Value (Ignoring Profitability)]
- Changing Your TRB Stake Amount
- Running Telliot to Submit Values on an Interval (Ignoring Profitability)
- Running Telliot to Listen for Tips (Profitability)
- Using Screen to Keep Telliot Running (on AWS)
- Minimizing the Risk of Disputes
Note: If telliot is installed in a python virtual machine, be sure to activate it with: source tenv/bin/activate
Note: If you want to stop telliot from operating at any time, you can shut it down with [CTRL+c]
Configure reporting accounts
First, we will set the account(s) that we want to use for staking TRB and reporting. The telliot account command is used with the following format:
telliot account add MumbaiAccount 0xblahblahmyPrivateKey 80001
You can replace “MumbaiAccount” with any name you choose for your reporting account.
Replace “0xblahblahmyPrivateKey” with your reporting wallet’s private key.
The “80001” indicates that you want to use this account for reporting on network Id 80001: Polygon Mumbai Testnet.
You will be prompted to set a password for your account. If you ever forget the password, you can simply create another account with the correct information. You can see a list of your accounts and their public addresses with the command:
telliot account find
Accounts can be deleted with:
telliot account delete AccountName
Note: When using Telliot Accounts, you should create a separate account for each network even if you want to use the same address on different networks. This is because account selection sets the network you are reporting on. For example: To use the same wallet address for staking Goerli TRB and reporting on Goerli Tellor, create another Telliot Account like this:
telliot account add GoerliAccount 0xblahblahmyPrivateKey 5
Configure Node Endpoints
Before we can report on Polygon Mumbai, we need to set the Mumbai node endpoint url. This can be done with your default text editor if you’re working with a local machine. If you followed the Noob friendly install guide and/or you’re using AWS, you’ll need to use a command line editor like nano.
Open up the file [telliot/endpoints.yaml] with nano:
nano telliot/endpoints.yaml
Your screen should look something like this:
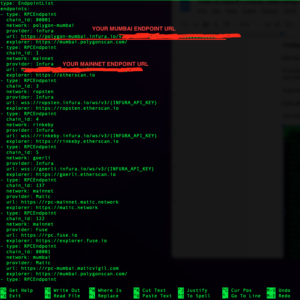
Use the arrow keys to navigate the document and replace the example node URL with your own for each network that you want to report to. We are using Mumbai, so edit the endpoint for Polygon Mumbai. (note: An Ethereum Mainnet endpoint is also required for Telliot’s functionality.)
When you’re done editing and you want to save your changes, use [ctrl+x] [y]. If you make a mistake, you can exit the document without saving changes by entering [ctrl+x] [n] and start again.
Once you have an account and your node endpoints are configured, you’re ready to report some Tellor data!
Using Telliot to submit a ETH/USD Spot Price (Ignoring Profitability)
This is the exciting part! We’re going to start telliot, confirm the configuration, and enter our account password. Telliot will deposit our stake automatically, fetch the ETH/USD price data from multiple APIs, find the median value, and submit that value to the Tellor database.
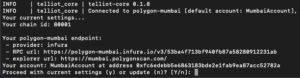
Start telliot with this command:
telliot report -a MumbaiAccount -qt eth-usd-spot -p YOLO -ncr
Here’s what it means: You want to report the query type ETH/USD spot (-qt eth-usd-spot), you don’t care about checking for profit (-p YOLO), and you’re not listening for autopay tips (-ncr (no check rewards)). Remember to replace “MumbaiAccount” with your Telliot account name if different.
The terminal log should look like this:
Press [ENTER] to skip configuring accounts and enter your password when prompted. Telliot will output some information about gas settings and profit threshold (ignore this for now):
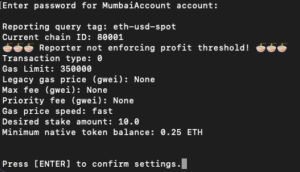
Press [ENTER] to confirm your settings. Telliot will now automatically attempt to deposit one stake worth of TRB and submit the oracle data. Type in your password when prompted, and watch the log for a reported data transaction:
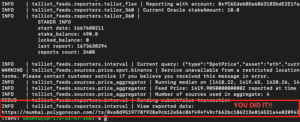
When telliot submits a successful report it will output a link to the transaction on the block explorer. Head over to the Tellor Data-Feed and look for your address! Congratulations! You’re a Tellor reporter! ?
Changing Your TRB Stake Amount
If you’ve gotten this far, you’re probably already aware that reporting Tellor data requires staking TRB tokens. The stake amount is different on different networks, and it is variable based on the price of TRB.
One stake allows for calling the submitValue function once every 12 hours. This means that if you’re following this guide and you just reported ETH/USD you cannot report again for 12 hours unless you increase TRB stake. Use the following command to increase your stake to 500 TRB:
telliot report -a MumbaiAccount -s 500
Press [ENTER] to skip account settings and confirm your gas settings just as before and input your password when prompted. The log will print useful information about your account and the change in stake status:
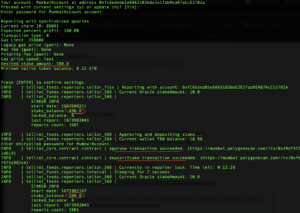
After the log prints “depositStake transaction succeeded”, you can shut down Telliot with [CTRL+c].
Running Telliot to Submit Values on an Interval (Ignoring Profitability)
Start telliot with this command:
telliot report -a MumbaiAccount -qt eth-usd-spot -p YOLO -ncr -wp 3600
Here’s what it means: you want to report the query type ETH/USD spot (-qt eth-usd-spot), you don’t care about checking for profit (-p YOLO), you’re not listening for autopay tips (-ncr (no check rewards)), and you want to submit once every hour. The -wp (wait period) flag allows you to set the interval for reporting in seconds (there are 3600 seconds in 1 hour).
Note: Even if you’ve increased your stake, you may still be in reporter lock after your first report. If so, the log will inform you with a print like this:
INFO | telliot_feeds.reporters.tellor_360 | Currently in reporter lock. Time left: 0:12:13
Feel free to wait, or grab some more testnet TRB to stake so that you can report more often.
Running Telliot to Listen for Autopay Tips (Profitability)
A “tip” on the Tellor network represents a request for oracle data, and the first reporter to submit the requested data can claim a (usually small amount of) TRB.
Telliot can be used to listen for these tips and submit the requested data automatically. As it listens, Telliot will check the status of the network and calculate profitability. The reporter can configure telliot with a custom profit threshold with the [-p] flag. If the [-p] flag is left out, telliot will only submit when the tip is 2x the gas cost (100% profit).
Again, please use this functionality at your own risk. Profits are possible but not guaranteed.
Start telliot with this command:
telliot report -a MumbaiAccount -p 50 -wp 60
Here’s what it means: You want to check to see if there is a profitable tip every 60 seconds (-wp 60), and you want to make sure that you make at least a %50 profit after gas cost (-p 50).
Note: A wait period of 60 seconds is recommended if you’re using a RPC service like infura. This will limit your node calls so that you don’t have to pay subscription fees. If you’re not worried about making too many node calls the [-wp] flag can be left out.
Using Screen to Keep Telliot Running (on AWS)
When we’re using telliot for recurring data submissions or listening for tips, we want telliot to continue running even when we’re not logged into the AWS console. One popular solution is called screen.
Screen sessions can be thought of like terminal windows. You can create as many screen sessions as you want, and any processes running in a screen session will run continuously until you open that “window” and shut down the process.
Start a new screen session with the command:
screen -S telliot
You’ll be taken to a fresh terminal “window”. You can now mount your python vm with [source tenv/bin/activate] and start Telliot.
To exit the screen session use the keyboard shortcut [CTRL+a+d].
This will take you back to the “main” terminal window. You can check your open screen sessions with the command:
screen -ls
This will output a list of screen sessions including the one you just made named “telliot”. To reconnect to the telliot screen session use the command:
screen -r telliot
You should see the telliot log there still chugging away.
To close a screen session, first reconnect to it and then use [CTRL+d].
This method can also be used to run multiple telliot processes on the same AWS machine.
Minimizing the Risk of Disputes
When a reporter submits a value to the Tellor database, that value is subject to dispute if it is inaccurate. See the docs for a full explanation of the disputing mechanism.
Telliot development strives to eliminate the chance of accidentally reporting inaccurate values, but the risk of losing staked TRB is real. In many cases the best way to minimize dispute risk is to keep some TRB on hand to dispute your own accidental bad value.
The disputeable values monitor can help. It’s a process that monitors all Tellor data submissions and sends text alerts if a questionable value is detected.
Troubleshooting
If you got a python error or traceback while trying to use telliot, here are some things to try:
- Check that your flags and account names network Ids and passwords are all correct.
- Check the that the urls in endpoints.yaml are correct and complete.
- Deactivate your python virtual machine using the [deactivate] command, then activate it again with [source tenv/bin/activate]
- Delete your tenv folder and reinstall Telliot. Your accounts and configuration files are not affected by this.
Thanks for Reading!
For more information about how Tellor works, head over to docs.tellor.io.
Questions? Feel free to give us a shout in the Discord!
Have a great day ?