
This is a step by step guide for how to use Tellor’s open-source auto-tipper-bot to automate tipping strategies for using Tellor as your primary oracle. We will also cover how to set up fallback tipping for protocols that use Chainlink as their primary oracle and Tellor as their secondary oracle.
Note: Tipping tellor reporters involves handling private keys. It costs real TRB tokens and gas. The auto-tipper has been tested, but it is not fool proof and you are using it at your own risk. It’s best to practice on a testnet (like mumbai or sepolia) before using the auto-tipper on mainnet to avoid wasting funds due to incorrect settings. Info on where to find testnet TRB for your network can be found here.
Prerequisites:
- A computer or virtual machine running linux with python 3.9 installed as the current version. A guide for installing Python 3.9 and venv can be found here. A guide for using GNU screen to keep Tellor clients running continuously can be found here.
- An ethereum address that holds TRB tokens and native tokens (gas) for the network on which you want to report oracle data.
- Node endpoints for the network(s) where you are tipping. You can use your own node, or use a provider like Infura.
The Guide
This is a beginner-friendly guide. Familiarity with the command line will be helpful, but otherwise no assumptions are made about your technical skills. We will go over all the commands necessary to set up the Auto Tipper Bot to incentivize Tellor reports on any Tellor network using autopay tips.
Download Necessary Files and Create the Python Virtual Environment
1) Clone the repo git clone https://github.com/tellor-io/auto-tipper-bot.git
2) Change the current directory to be the auto-tipper-bot folder. cd auto-tipper-bot
3) Create a python virtual environment for installation. python3 -m venv venv
4) Activate the virtual environment. source venv/bin/activate
Your command prompt should now show “(venv)” on the left to indicate that you’re using a virtual environment. (like the picture below)
![]()
Important: If you’ve completed these steps and you’re seeing errors related to python, pip, or venv, these will need to be dealt with before you can continue. Here’s a step-by-step guide for installing python and venv.
Install the Auto-Tipper-Bot
1) Install the auto-tipper bot in editable mode from your local directory with pip: pip install -e .
Edit the .env file
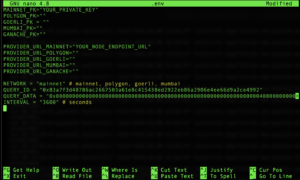
The .env file is a hidden file that holds the private keys and node endpoint urls that the auto-tipper will use for calling ethereum functions. This is also where you will provide the encoded queryID and Query Data for the oracle data that you’re using. We will edit this file using a cli based text editor. (Screenshot below for reference)
1) Rename the example .env file with the command mv .env.example .env
2) Open the file with the command nano .env
3) Add the private key for your tipping address and the URL for your node endpoint in between the quotation marks where indicated in the .env file. (see image below)
4) Edit the Query_ID and Query_Data for the Tellor oracle data that you want to request. If you’re not sure what to use for Query_ID and Query_Data, check out the docs here, visit the queryID Station here, or simply ask us for help in the Tellor Discord. (we love to hear from users!) The default query is ETH/USD spot price.
5) If necessary, change the NETWORK to match the network you’re using. Just replace the network name in the quotes.
6) Set the interval (seconds) in between the quotes to match your desired data update frequency. For example: If you want your data to be reported once per hour, enter a value of 3600 as shown here:
7) When you’re done editing and you want to save your changes, use [ctrl+x] [y] and press enter to confirm.
Tip: If you make a mistake while editing in nano, a simple solution is to exit the document with [ctrl+x] [n] (don’t save changes) and press enter to confirm. Then open the document and start editing again.
Run the Tipper!
To run the tipping script, simply run the tipper command: tipper
The log will now show useful information about what the program is doing:

First, the tipper checks if the autopay contract has permissions to spend your TRB tokens, and increases the allowance if necessary. Next, it will check if the specified queryID has been reported recently. Finally, if the previous report is older than the specified interval, the tipper will create a tip transaction. The size of the tip (paid in TRB) is equal to the estimated gas cost for the data update plus a small profit ($2) for the reporter.
Using the Auto-Tipper as a Chainlink Fallback
This is a great option for lending protocols that use Tellor as a “Liquity style” fallback where chainlink is the primary oracle. A separate branch of the auto-tipper is required.
1) First, download the liquity-backup branch of the auto-tipper-bot with the following command: git clone https://github.com/tellor-io/auto-tipper-bot.git -b liquity-backup
2) Change the current directory to be the auto-tipper-bot folder. cd auto-tipper-bot
3) Create a python virtual environment for installation. python3 -m venv venv
5) Activate the virtual environment. source venv/bin/activate
Edit the .env file
1) Rename the example .env file with the command mv .env.example .env
2) Open the file with the command nano .env
3) Add the private key for your tipping address and the URL for your node endpoint in between the quotation marks where indicated in the .env file. (see image below)
4) Edit the Query_ID and Query_Data for the oracle data that you’re monitoring. If you’re not sure what to use for Query_ID and Query_Data, check out the docs here, visit the queryID Station here, or if ask us in the Tellor Discord. The default query (shown in the image below) is ETH/USD spot price.
5) Be sure to change the NETWORK also to match the network you’re using. Just replace the network name in the quotes.
6) Set the interval (seconds) for how often you want to tipper to check the status of Chainlink’s feed.
7) Set the CHAINLINK_AGGREGATOR_ADDRESS, CHAINLINK_IS_FROZEN_TIMEOUT, and CHAINLINK_MAX_PRICE_DEVIATION_FROM_PREVIOUS_ROUND to match the fallback conditions that trigger your Tellor integration.
8) When you’re done editing and you want to save your changes, use [ctrl+x] [y] and press enter to confirm.
Run the Tipper!
Simply run the tipper command: tipper
The log will show some basic information to indicate that it’s functioning correctly.
Note: When using the liquity-backup tipper, be sure that the connected Ethereum address holds native tokens (gas) and TRB tokens on the correct network so that it can create tips if Chainlink fails!
Thanks for Reading!
Questions? Feel free to give us a shout in the Tellor Discord! You can yell at me (or thank me) directly by tagging spuddy.eth#2499 or find me on Twitter https://twitter.com/0xSpuddy.
Have a great day ?