This is a step-by-step guide for installing and using the Disputable Values Monitor (DVM). The methods outlined here should work on a fresh installation of Ubuntu 20.04 LTS (Amazon t2.small AWS instance). Individual commands may differ with other environments particularly for installing python 3.9.
Note: The Disputable Values Monitor uses feeds from telliot-feeds, and endpoints.yaml is shared. If you’re using the DVM to monitor a set of networks that’s different from the set that you report on with Telliot, it’s easier to use a separate machine (or VM instance) for the DVM.
Prerequisites:
- A computer or virtual machine running linux with python 3.9 installed as the current version. A guide for installing Python 3.9 and venv can be found here.
- You’ll need to use tmux or screen to keep your DVM running when you’re not logged in. Check out my guide for using screen here.
- Node endpoints for Ethereum Mainnet and the network(s) that you want to monitor. You can use your own node, or use a provider like Infura.
- If you plan to use the DVM for automatic disputing, you will need the keys to a eth address loaded with TRB tokens and gas (native tokens) for calling the dispute function.
- A Discord webhook for sending alerts.
Installation:
Download Necessary Files and Create the Python Virtual Environment
1) Clone the repo: git clone https://github.com/tellor-io/disputable-values-monitor
2) Change directory to the disputable-values-monitor folder: cd disputable-values-monitor
3) Create a python virtual environment for installation: python3 -m venv env
4) Activate the virtual environment: source env/bin/activate
Your terminal command prompt should now show “(env)” on the left to indicate that you’re using a virtual environment as in the image below:
Note: If you’ve completed these steps and you’re seeing errors related to python, pip, or venv, these will need to be dealt with before you can continue. Here’s a step-by-step guide for installing python and venv.

Install and Configure the DVM
1) Install poetry: pip install poetry
2) Install the Disputable Values Monitor with the command: poetry install
3) Copy the “vars.example.sh” and rename it to “vars.sh”: cp vars.example.sh vars.sh
4) Open vars.sh in nano (or your preferred text editor): nano vars.sh
5) Use your arrow keys to navigate the file. It should look like the image below. Replace the example url with your own Discord webhook url.
When you’re done editing, use ‘crtl+x’ to exit the document and choose ‘y’ to save your changes overwriting vars.sh.

6) Export these environment variables with the command: source vars.sh
Configure chains you want to monitor by providing RPC (node) endpoints.
7) Generate telliot config files with the command telliot config init
Note: If you’ve already used telliot on your machine, config init can be skipped.
8) Change directory to the telliot folder: cd ~/telliot
9) Open endpoints.yaml in your text editor: nano endpoints.yaml
9) Use your arrow keys to navigate the file. You’ll see dashes on the left side followed by 6 lines for each network where Tellor is deployed:
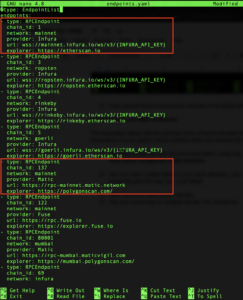
The Disputable Values Monitor will listen for newReport events on every network included in the endpoints.yaml file. Carefully delete the lines for all the networks that you don’t want or need to monitor with the DVM. (Use ctrl^k to delete lines.)
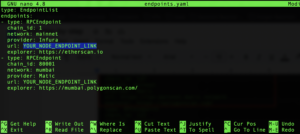
For the networks that you do want to monitor, simply edit the url to match your endpoint as shown in the picture here:
You are now ready to use the DVM!
Start the Disputable Values Monitor!
At the time of writing the DVM can be used two different ways: a discord alert bot, or an auto-disputer.
To use the DVM as a disputable Tellor value Discord bot:
1) Load variables: source vars.sh
2) Start the DVM with the command: poetry cli -c 0.1 --wait 60. You will be prompted on whether or not you want to run alerts only . Enter “y”.
Note: The threshold for alerts is adjusted by changing the value of the [-c] flag. A value of 0.1 means that you want to get a text if the value is 10% different from the value calculated by the DVM. If you wanted to increase the threshold to 25%, use a value of 0.25 and so on.
To Automatically Dispute Bad Values
Note: When the -d flag is used, the DVM will not send Discord alerts unless it reads a value that triggers the auto-dispute threshold.
Important: Values submitted to Tellor are subject to dispute if they are incorrect. If you’re not familiar with the dispute system, please take a moment to read the DISPUTING DATA section of the Tellor documentation before you continue.
Caution: Practice running the DVM on a testnet first! See here for instructions on how to get testnet TRB for initiating test disputes. This is not foolproof software and your real TRB could be lost if you accidentally dispute a good value. (Use at your own risk.)
First, we need to provide an Ethereum account that the DVM can use for calling functions. I’ll use polygon mumbai testnet for the example / screenshots included below.
1) Add your disputing address as a telliot account with the command: telliot accounts add ACCOUNT_NAME 0xYOUR_PRIVATE_KEY 80001
Replace “ACCOUNT_NAME” with any name you choose. Change the private key to the private key of your disputer wallet address. At the end, provide the network ID for your Tellor network (I’m using 80001 for Polygon Mumbai Testnet). After you enter the telliot account command you will be prompted to set a password.
Note: If you want to automatically dispute bad values on multiple Tellor networks, include all of those networks at the end of your command separated by a single space:
telliot account add ACCOUNT_NAME 0xYOUR_PRIVATE_KEY 80001 137 10 11155111 1Tip: Here are some other useful commands for managing telliot accounts:
telliot account findShows a list of accounts (with their public address).
telliot account delete AccountNameDeletes the keys for the account “AccountName”.
Edit Your Disputing Configuration
1) Open and edit the dispute-config.yaml file with your text editor of choice: nano disputer-config.yaml
2) Use your arrow keys to navigate the file. You will find that the DVM is pre-configured to automatically dispute two types of data: ETH/USD spot prices, and EMVCall. (see image below)
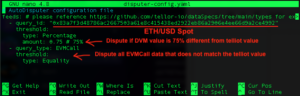
Additional Spot prices are added by carefully copying and editing the 4 lines corresponding to “query_id”, “threshold”, “type”, and “amount”. For example, if you want to automatically bad ETH/USD and STETH/USD values, add a copy of the code for ETH/USD and edit the queryId to be the STETH/USD queryId.
Tip: You can easily generate queryIDs for spot prices using the tools at https://tellor.io/queryidstation/.
Start the DVM With the -d Flag
1) Load variables: source vars.sh
2) Start the Disputable Values Monitor with the command: cli -d -a YOUR_ACCOUNT_NAME --wait 60Replacing “YOUR_ACCOUNT_NAME” with your telliot account’s name.
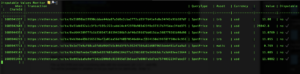
Enter your password when prompted. You should see a graph with recent submissions.
Note (again): With the `-d` flag, the DVM will only send Discord alerts for queries listed in disputer-config.yaml at the threshold for auto-disputing.
Thanks for reading!
Questions? Feel free to give us a shout in the Tellor Discord! You can yell at me (or thank me) directly by tagging spuddy.eth#2499 or find me on Twitter.
Have a great day ?